- March 28, 2019
- Posted by: SouTech Team
- Category: Blogging, Development, Freelancing, Graphics and Branding, Graphics and Branding Training
How to Resize an Image in Photoshop

In changing the size of an image in Photoshop, it is mostly advised that you start with an image that is a lot larger than a smaller one. This is because when you enlarge an image a lot on Photoshop, it becomes pixelated and the details are mostly blurry and lost. To see the information of your document or image, go down to the status bar beneath your document window. Click and hold on the document size information till a small box pops up showing you the information of your image.
For this tutorial, we’ll be going through how you can easily resize an image in Photoshop using the simplest short steps.
Step 1
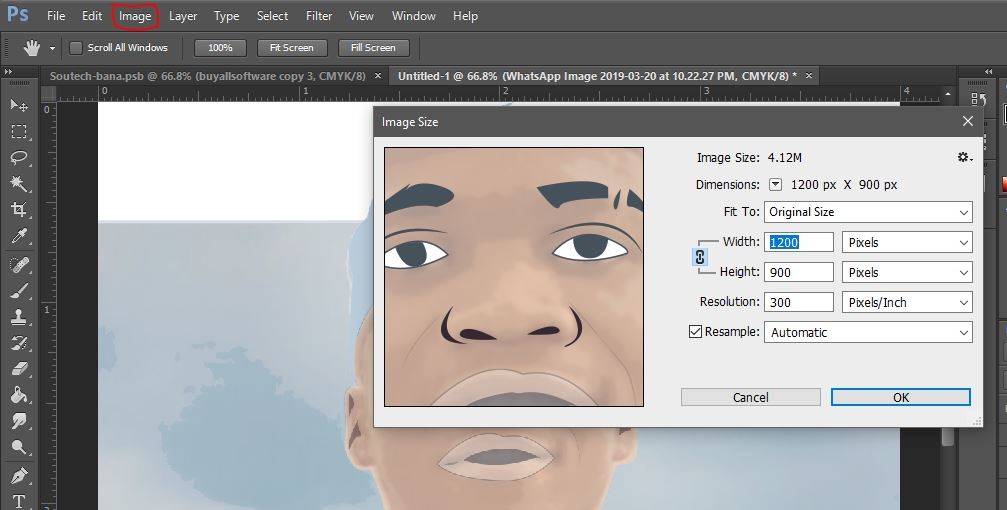
Having opened your image in Photoshop, scroll up to the menu bar and select “Image”. From the dropdown options, select “Image Size.”
Step 2
A box would open when you select “Image Size” with the following features:
- Image Size
- Dimensions
- Fit to
- Width
- Height
- Resolution
- Re-sample
Step 3
Go to the width and enter your preferred image size as well as in the height box too. Let your unit of measurement be either “pixels” or “inches”.
Step 4
Input your image width and height while the “link” icon is highlighted and the “Resample” box is checked.
Step 5
Once you’ve inserted your size, hit “OK” and your change is effected.
Here at SOUTECH, we give the best training and services for all your graphics need. To Contact Us, Partner and get more of our Services, click the link below:


